Category Archives: Networking

vSphere Metro Storage Cluster Networking: Part 3

This post has been much delayed for a number of reasons, namely because some feasible solutions became End of Sale, while others, based on field experience were not practically seen or deployed. In the meantime, other newer solutions which can address some of the issues we discussed earlier have now become available, so here is Part 3.

So back in Part 1, I blogged about considerations for the L2 DCI link for a vSphere Metro Cluster. In Part 2, I covered the potential routing pitfalls of stretching L2 networks across sites.

In Part 3, I’m going to discuss the methods which can be used to workaround the some of issues which we talked about in Part 2. Just to recap, the issues with stretched networks were:

  • Asymmetrical traffic flow across DC sites
  • Inability of network services (eg firewalls) to handle asymmetric traffic flow
  • Lack of VM site-awareness for optimized routing
  • Inefficient use of the DCI

VMware NSX Distributed Firewall with Asymmetrical Traffic Flows

In Part 2, I mentioned that it is possible for a VM to move between sites, with the result being that traffic to the VM (ingress traffic) could come in on say DC1, while traffic from the VM (egress traffic) could exit on DC2. Such a situation would cause issues with traditional firewalls, since these need to see traffic flows in both directions in order to allow or deny traffic correctly.

vMSC Invalid Firewall State

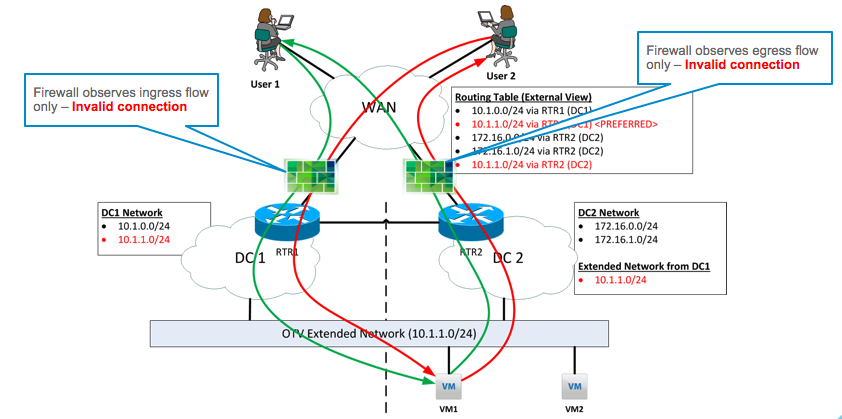
Perimeter Firewalls do not see consistent flow state

In the diagram above, the firewall at DC1 sees the “in” state of the flow from both User 1 and User 2 to VM1, which happens to have vMotioned to DC2. Assuming we’ve tweaked the setup for local egress, the VM will send traffic out via the DC2 router. As a consequence, the firewall at DC2 sees only the “out” state of the flow. This means that firewalls at both sites would observe any or all of the following issues and start dropping traffic because of state inconsistencies:

  • Incomplete TCP handshake / termination
  • Inconsistent sequence numbers
  • Unidirectional traffic flow

With NSX for vSphere, it’s actually possible to deploy a stateful firewall at the VM level using the Distributed Firewall (DFW) feature. NSX DFW works by having security policy defined centrally via NSX, which is then pushed down to corresponding VMs for enforcement at the micro level. With this being the case, we’ve brought the firewall closer to the VM itself by enforcing policy at the vNIC level.

NSX DFW sees flow state

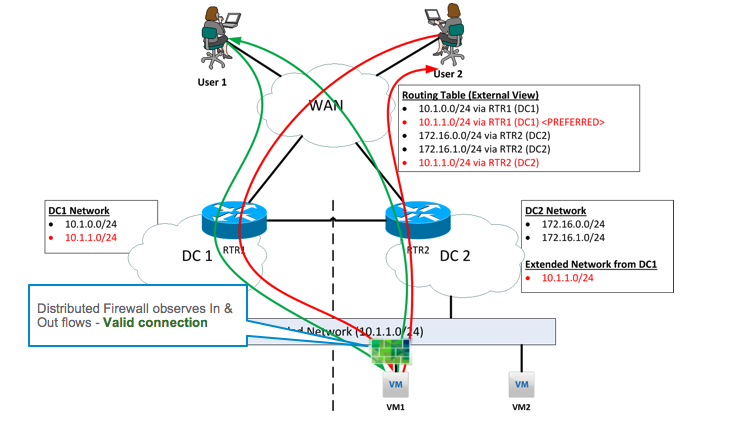
NSX Distributed Firewall sees full flow state

Looking at the diagram above, the network ingress and egress paths of traffic to the VM are still inconsistent. However, the firewall enforcement point is at the vNIC level, which is tied to the VM. At the vNIC level, the DFW will always observe all traffic entering and exiting the VM. The DFW filter will have full information on the network traffic flows of the VM, and be able to appropriately apply stateful firewall policies, regardless of where the VM is or moves to, or how traffic arrives and departs from it. We’ve effectively resolved the problem of stateful perimeter firewalls not working due to not seeing the full traffic flow, by moving the firewall to the VM vNIC.

Other Methods

It bears mentioning that there are/were other methods of addressing some of the other network considerations that come with stretching networks. When writing both Part 1 and 2, I  considered writing more on these methods, however it appears that they are not quite feasible in the real world. Here is just a summary of what might have been.

Locator ID Separation Protocol (LISP): As you may have realized, there doesn’t seem to be a solution which has VM site awareness, so there is no way to optimize ingress routing to VMs according to which site they are located on (potentially also reducing DCI traffic). The fact is, LISP was supposed to address this issue, by being able to insert granular routes to VMs depending on where they resided. The biggest challenge with utilizing LISP in order to optimize ingress routing to the VM is that it requires ISPs to support LISP within their infrastructure. It is quite rare to come across such ISPs in the real world. Also, LISP plays a lot with insertion of host routes, which is its own set of network black magic.

DNS Optimization with Cisco ACE Load Balancers: Cisco also developed an orchestration solution utilizing its global and local load balancers to dynamically update DNS A records to point to wherever a VM was vMotioned to. This would enable new connections to directly reach the VM at it’s new location, thus also ensuring new connections do not have to traverse the DCI. It’s really quite a creative hack, though unfortunately the Cisco ACE product line was EoS’ed not long after the solution was published.

vSphere Distributed Virtual Switch: Packet analysis using ERSPAN

Packet analysis is invaluable in troubleshooting network issues and network monitoring. While packet analysis used to be used only in the domain of physical networks, that is no longer the case.

The vSphere Distributed Virtual Switch is now able to produce dumps of specific virtual network traffic and transport using ERSPAN to packet monitoring consoles. Yes, that’s right, using the Distributed Virtual Switch you can monitor network traffic in the virtual realm even if the traffic doesn’t actually hit the physical wire.

I didn’t quite see much material covering this so far, so I thought I’d show how this would work. For this blog post, I used the following:

  • Distributed Virtual Switch (vSphere Enterprise Plus)
  • Wireshark installed in a monitoring console (my personal laptop)
  • A VM which we want to monitor (a Windows 7 VM which is my jump box VM)

Let’s start with setting up Wireshark for packet capturing on the monitoring console. Opening Wireshark, go to Capture -> Interfaces.

That should open up a list of interfaces which we can capture from. Now I’d like to capture using the “Local Area Connection”, though it’s probably a good idea to find out what the IP address for that interface is. We’ll need to set it as a receiver for ERSPAN captured traffic. Click on “Options”.

We look out again for the “Local Area Connection” and note the IP address associated with the chosen receiving interface. In the case, it’s 10.2.1.110. We’ll checkbox the interface, and then click on “Start”.

Just like that, Wireshark will start dumping out all the traffic it gets on the interface. In this case, we only want to monitor traffic capture via ERSPAN on the Distributed Virtual Switch. Since ERSPAN encapsulates traffic in GRE, that’s what we’ll filter for. Type in “gre” into the filter field and click on “apply”, which should immediately filter out all the “noise” packets.

Now Wireshark is set up correctly, let’s turn our attention to setting up ERSPAN. Select the Distributed Virtual Switch, which in my example is “dvSwitch”. Go to Settings->Port Mirroring. Click on “New”.

In the pop-up dialog, select “Encapsulated Remote Mirroring (L3) Source”. This enables us to remotely send dump out traffic to a monitoring console over IP. Click “Next”.

Give the session a name, and change it’s status to “Enabled” to activate ERSPAN port-monitoring. Click “Next”.

Add a network traffic source by clicking on the icon below. A source is the object which we’d like to capture network traffic from.

A list of ports will pop up. You can choose one more more VMs, or one or more VMKnics to monitor and capture from. In this case, let’s choose a Windows 7 desktop VM. Click “OK”.

You can see the the VM we’ve selected is now shown as one of the sources of traffic for packet capture. Click “Next”.

Now, we’ll need to tell the Distributed Virtual Switch where to send the captured traffic. Click on the “+” sign to add a destination.

This is where we type in the IP address of the monitoring console which has Wireshark enabled. If you remember, we noted back when we were setting up Wireshark that the IP address for the receiving interface was 10.2.1.110, so that’s what we type in and click “OK”.

That done, we’ll review the settings one last time, and make sure everything is in order. Click “Finish” when everything is good to go.

Jumping back to the Wireshark console, we should immediately see traffic being dumped over the network by the Distributed Virtual Switch and showing up on the screen. On the Windows 7 desktop, I used a browser to access this http://kacangisnuts.com/, and the result is quite a bit of captured HTTP traffic. Just for fun, I selected a HTTP GET request and followed its TCP communication stream to see what was being communicated.

The captured traffic stream is pieced together and shown below; it’s the HTTP conversation between the Windows 7 desktop’s browser and my blog server.

So there you have it, this is a quick blog entry I whipped up to show how to use ERSPAN for packet capture and analysis. This shows how, with the right tools, you can still use good ol’ conventional network analysis and troubleshooting methodologies to monitor and solve problems for VMs, just like you would for systems in the physical network world.

A Demo of the vCloud Networking and Security App Firewall

I will be presenting at Cloud Sec 2013 Singapore, so shout out if you happen to see me there!

Since it’s a gathering of security techies, I thought it would be interesting to switch things up a bit and do a live demo of the vCloud Networking and Security App Firewall. In this demo, it’ll be used to protect WordPress set up as a 2-tier application against possible attacks by a compromised host within the same layer 2 network in the virtual data center.

The demo is slated to be done live, though of course there’s always the good ol’ recorded backup in case Murphy’s Law decides to strike. Thought it’d be a good idea to share this out as well, as I personally think that App Firewall rocks, especially when you use EtherApe and NMAP to show it in action.