Category Archives: Networking

Datadog NetFlow Monitoring with FluentD

I recently worked on an interesting assignment where NetFlow monitoring was needed for network traffic analysis. Now, the Datadog platform has a rich feature set for analyzing and visualizing just about any type of data, and NetFlow is no different.

The only unusual aspect of the assignment was with collection; We’ll need to use the open source FluentD to collect NetFlows, so in this post I’ll share how FluentD can be used to collect flows for analysis on the Datadog platform.

Brief Overview

I’ve not had a chance to work with FluentD previously, though I’ve heard good things about it. What’s useful about the FluentD agent is that it is modular and extensible with plugins. Particularly, it has both a Netflow Collector source plugin and the Datadog output plugin, which we need. Fun fact, the NetFlow plugin is a certified FluentD plugin, while the Datadog plugin is directly maintained by Datadog developers!

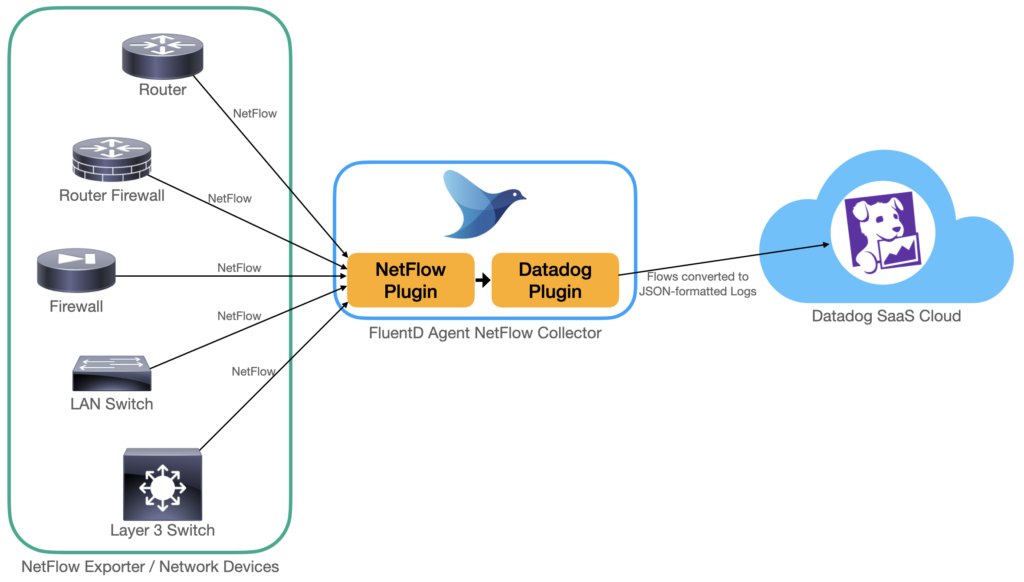
With both of these plugins available, it becomes a matter of configuring FluentD as a NetFlow collector, which will then convert flows to JSON-formatted logs to be submitted to Datadog. It’s really as simple as the diagram below.

The big picture: How FluentD collects and send NetFlows to Datadog

Getting Started

We use a vanilla Ubuntu 18.04 LTS VM, and install the pre-compiled FluentD agent like so:

$ curl -L https://toolbelt.treasuredata.com/sh/install-ubuntu-bionic-td-agent4.sh | sh

This installs the latest FluentD agent, and automatically configures systemctl to start it as a service. In case you’re using some other Linux distro, pop over to the FluentD Installation page and follow the distro-specific instructions. I’ve tested a similar set up with RHEL 7, and that works flawlessly too.

Once done, run a quick systemctl check to ensure that the agent is up and running:

$ sudo systemctl status td-agent
● td-agent.service - td-agent: Fluentd based data collector for Treasure Data
   Loaded: loaded (/lib/systemd/system/td-agent.service; enabled; vendor preset: enabled)
   Active: active (running) since Sun 2021-04-11 10:20:00 UTC; 15s ago
     Docs: https://docs.treasuredata.com/articles/td-agent
  Process: 17416 ExecStart=/opt/td-agent/bin/fluentd --log $TD_AGENT_LOG_FILE --daemon /var/run/td-agent/td-agent.pid $TD_AGENT_OPTIONS (code=exited, status=0/SUCCESS)
...

That all looks hunky dory, but what on earth is all that td-agent business, you ask? It turns out that the company Treasure Data maintains most (all?) stable distribution packages of FluentD. Hence, the FluentD agent is called td-agent in these distributions. You can read more about it in the official FluentD FAQ, but suffice to say that td-agent is equivalent to FluentD for our purposes. Keep in mind though, this does mean that command names, configuration files, etc will carry the td-agent name instead.

Installing the NetFlow Collector Source Plugin

Here, we install the Netflow plugin for FluentD, which turns the FluentD agent in to a NetFlow Collector. Run the following command to install the plugin:

$ sudo /usr/sbin/td-agent-gem install fluent-plugin-netflow

Insert the following lines into /etc/td-agent.conf. I use UDP port 5140 to receive flows in my lab, though you can change this to other ports if you like. Remember to point the NetFlow Exporter to the right UDP port later.

<source>
  @type netflow
  tag datadog.netflow.event
  bind 0.0.0.0
  port 5140
  versions [5, 9]
</source>

If you notice, we’re tagging all flows with datadog.netflow.event. This tag will be used by FluentD to match and route the flows to the appropriate plugin for handling. The ‘next steps’, so to speak.

Installing the Datadog Output Plugin

Next, we install the Datadog plugin that will transport the flows as JSON logs to the Datadog cloud for processing and analytics.

$ sudo /usr/sbin/td-agent-gem install fluent-plugin-datadog

Add the following lines into /etc/td-agent.conf, BELOW the NetFlow plugin configuration from the last section, and insert your Datadog API key at the api_key parameter.

<match datadog.netflow.**>
  @type datadog
  api_key <API KEY>

  dd_source 'netflow'
  dd_tags ''

  <buffer>
    @type memory
    flush_thread_count 4
    flush_interval 3s
    chunk_limit_size 5m
    chunk_limit_records 500
  </buffer>
</match>

There are some interesting points about this configuration. Notice first that the match directive looks for datadog.netflow.**. The ** bit is a greedy wildcard, and causes the plugin to process any flows with a tag starting with datadog.netflow. That includes flows collected by the NefFlow plugin, which we earlier configured to apply a datadog.netflow.event tag.

Secondly, notice that dd_source 'netflow' is set, ensuring that flows have the tag source:netflow. It is Datadog’s best practice to use to the source tag as a condition to route logs (flow logs in this case) to the appropriate log pipeline after ingestion. The pipeline then processes, parses and transforms log attributes. Where possible, the pipeline also performs enrichment, for example adding country/city of origin based on a source IP address. This is actually a whole big topic on its own but suffice to say, it is important to configure the source tag appropriately.

Finally, there’s also the ddtag parameter which isn’t used in the example here. This allows the application of custom tags, which could be useful in a larger environments. For example, a large enterprise may have different NetFlow collectors for different zones (DMZ, Internet gateways, branches, data centers, just to name a few), different sites, different clouds etc. Being able to drill into a specific collection context or view using tags is handy to gain extra clarity during analysis.

Now that we’re done with configuring the FluentD agent, make sure to restart the service so the changes take effect.

$ sudo systemctl restart td-agent

Configuring pfSense as a NetFlow Exporter

Configuring a network device as a NetFlow Exporter differs depending on the device. In my case, I use a pfSense firewall as my NetFlow exporter. There are more detailed instructions on installing and enabling NetFlow for pfSense using the softflowd plugin, so we won’t go into the details here.

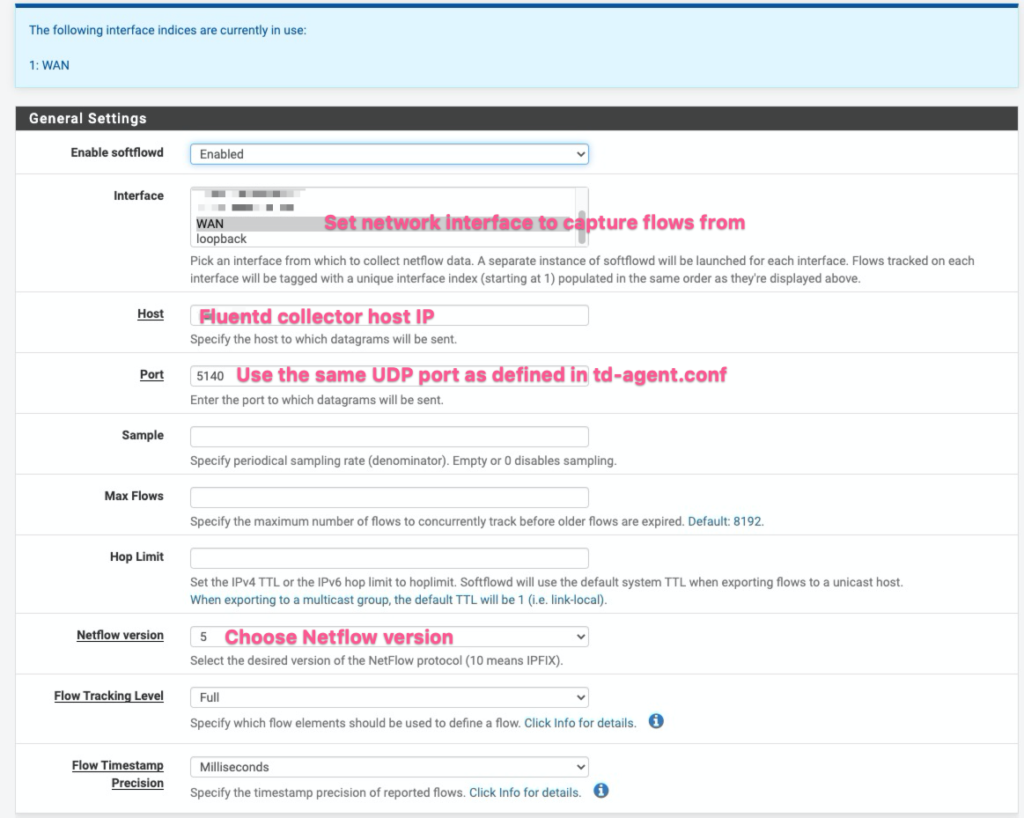
As a sample configuration however, here is how softflowd is set up on my pfSense firewall to export flows. In short, these settings configure the firewall to collect flows traversing the WAN interface, and then to send them as Netflow v5 flows to port 5140 of the FluentD NetFlow Collector.

pfSense softflowd config in a nutshell

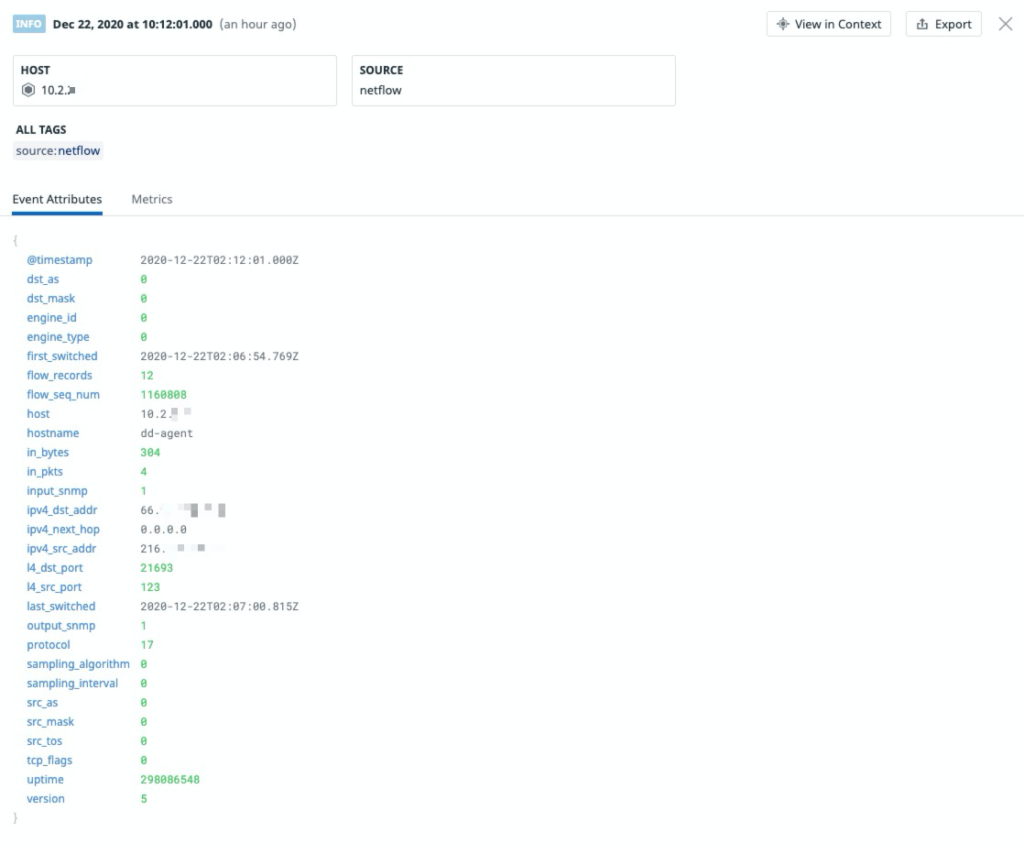
Assuming everything works as advertised, logging into the Datadog Log Explorer screen shows all the NetFlow flow logs that are collected. Popping open any of the flow logs shows the various attributes that were parsed from the flow logs. Unmistakably, the really important ones like Source IP, Source Port, Destination IP, Destination Port, Protocol type, as well as Bytes and Packets transferred are all available.

NetFlow ingested as JSON

Quick Peek at the NetFlow Dashboard

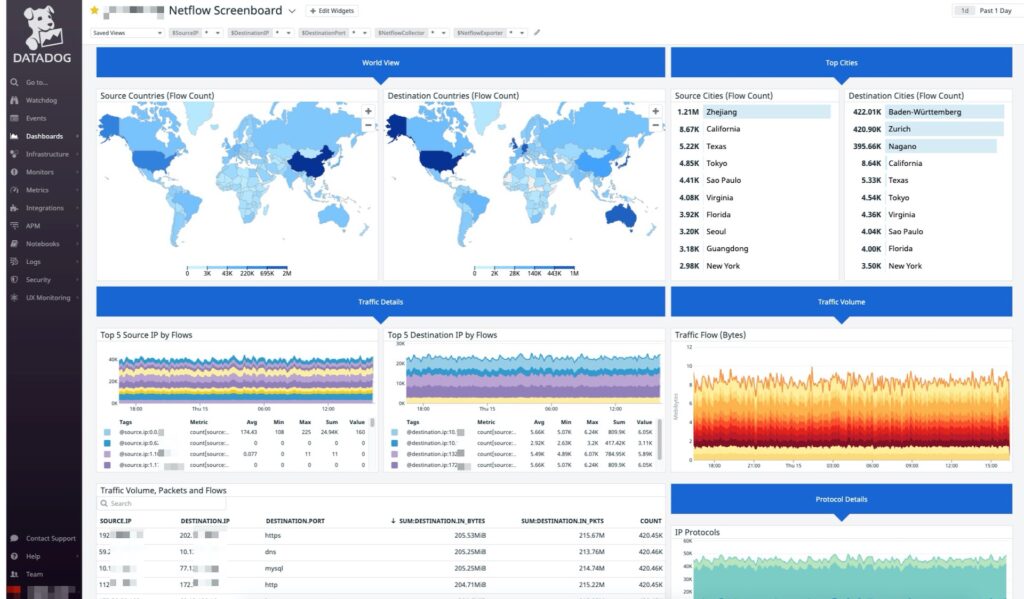
In the interest of keeping this post on topic around FluentD NetFlow collection, we’ll cover Datadog logs processing some other time. However, as a peek into the possibilities once we’ve got flows ingested, processed and analyzed, here’s a really groovy NetFlow monitoring dashboard that I created.

One global NetFlow Dashboard to rule the world

Neat, isn’t it?

Kubernetes Control Plane Resiliency with HAProxy and Keepalived

I had a bit of fun setting up an on-premise Kubernetes cluster some time back, and thought I’d share an interesting part of the implementation.

Briefly, today’s post describes how to set up network load balancing to provide resiliency for the Kubernetes control plane using HAProxy. To ensure that this does not create a single point of failure, we’ll deploy redundant instances of HAProxy with fail-over protection by Keepalived

Brief Overview – Wait, the what and the what, now?

A production Kubernetes cluster has three or more concurrently active control plane nodes for resiliency. However, k8s does not have a built-in means of abstracting control plane node failures, nor balancing API access. An external network load balancer layer is needed to redirect connections to the nodes intelligently during a service failure. At the same time, such a layer is also useful to distribute API requests from users or from worker nodes to prevent overloading a single control plane node.

The diagram below from the Kubernetes website shows exactly where the load balancer should fit in (emphasis in red is mine).

By the way, I definitely did not figure all this out on my own, but started by referencing the rather excellent guide at How To Set Up Highly Available HAProxy Servers with Keepalived and Floating IPs on Ubuntu 14.04, then adapting the instructions for load balancing k8s API servers on-premise instead.

Initial DNS and Endpoint Set Up

To make this work, you need a domain name and the ability to add DNS entries. It’s not expensive, a non-premium .org or .net domain costs about USD13 per year (less during promotions). It is useful to have a domain for general lab use, and for experiments like what we are doing here. Of course, if you’ve got an in-house DNS server with a locally-relevant domain, that’ll work as well.

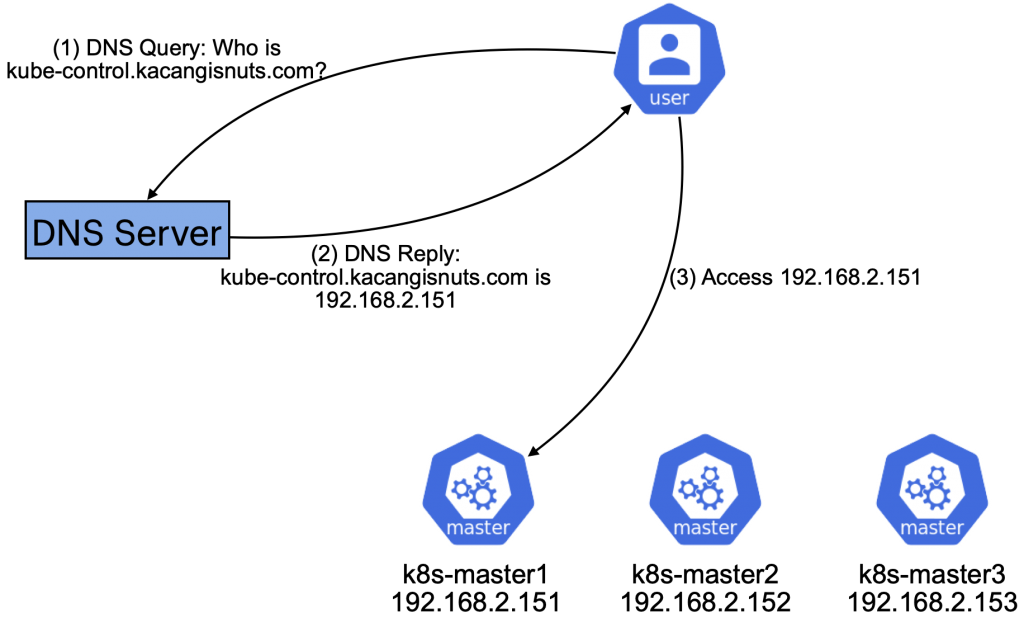
Whichever DNS service you go with, choose an fully-qualified domain name (FQDN) as a reference to your k8s control plane nodes. For example, I own the domain kacangisnuts.com, and would like my k8s control plane API endpoint to be reachable via the FQDN kube-control.kacangisnuts.com.

The steps to map the FQDN to an IP will differ by registrar. To start off, map the FQDN to the first k8s control plan node’s IP. We will update this later, but it is important to start with this to initialize the control plane. The mapping I use in my lab looks like the following:

  • DNS Record Type: A
  • DNS Name / Hostname: kube-control
  • IP Address: 192.168.2.151

With this DNS entry in place, all connectivity to kube-control.kacangisnuts.com goes to the first control plane node.

Initial DNS setup

At this point, set up the first and subsequent control plane nodes using the instructions at Creating Highly Available clusters with kubeadm. This post won’t go into the details of setting up the k8s cluster, as it’s all in the guide. A key point to note is that the FQDN to use as the k8s control plane endpoint must be explicitly specified during init. During my lab setup, that looks like:

kubeadm init --control-plane-endpoint=kube-control.kacangisnuts.com

Updating DNS and Configuring HAProxy Load Balancing

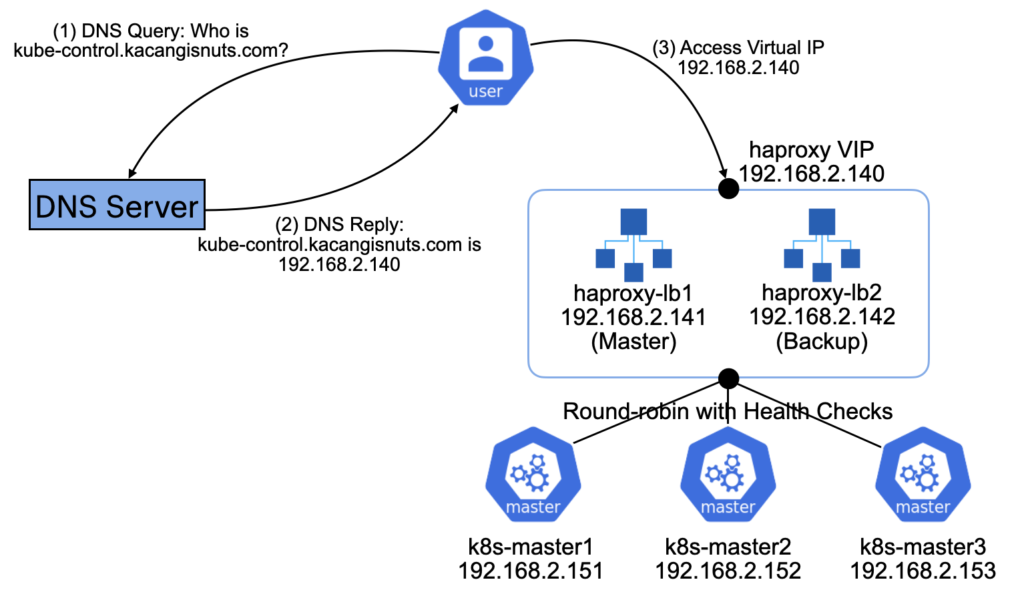
To get resiliency on the Control Plane, we will insert a pair of HAProxy load balancers to direct traffic across the control plane nodes. At the same time, we want to make use of health-checks to identify failed nodes, and avoid sending traffic to them.

Also, to avoid the load balancer layer itself becoming a single point of failure, we’ll implement load balancer redundancy by making use of Keepalived to failover from the Master HAProxy to the Backup HAProxy if a failure occurs.

At the end of the setup, we should have the following in place:

End state with load balancing and redundancy

To start, first modify the DNS entry for kube-control.kacangisnuts.com to point at the Virtual IP that will be used by HAProxy pair.

  • DNS Record Type: A
  • DNS Name / Hostname: kube-control
  • IP Address: 192.168.2.140

Set up two Linux instances to be redundant load balancers; I used Ubuntu 18.04 LTS, though any distro should work as long as you can install HAProxy and Keepalived. We’ll call these two haproxy-lb1 and haproxy-lb2, and install HAProxy and Keepalived on both like so:

sudo apt install haproxy keepalived

Without changing the default configs, append the following frontend and backend config blocks into /etc/haproxy/haprox.cfg for both haproxy-lb1 and haproxy-lb2:

frontend k8s-managers.kacangisnuts.com
        bind *:6443
        default_backend k8s-managers

backend k8s-managers
        balance roundrobin
        mode tcp
        default-server check maxconn 20
        server k8s-master1 192.168.2.151:6443
        server k8s-master2 192.168.2.152:6443
        server k8s-master3 192.168.2.153:6443

This configuration load balances incoming TCP connections on port 6443 to the k8s control plane nodes in the backend, as long as they are operational. Don’t forget to restart the haproxy service on both load balancers to apply the config.

$ sudo systemctl restart haproxy

Configuring Keepalived for Load Balancer Resiliency

Keepalived will use the Virtual Router Redundancy Protocol (VRRP) to ensure that one of the HAProxy instances will respond to any requests made to the Virtual IP 192.168.2.140 (which, if you remember, we mapped kube-control.kacangisnuts.com to previously).

The following are configurations that need to be set at /etc/keepalived/keepalived.conf for the respective load balancer instances. There are slight differences between the configs of the nodes, so be sure to apply them to the correct nodes.

# For haproxy-lb1 VRRP Master

vrrp_script chk_haproxy {
    script "pgrep haproxy"
    interval 2
    rise 3
    fall 2
}

vrrp_instance vrrp33 {
    interface ens160
    state MASTER
    priority 120

    virtual_router_id 33
    unicast_src_ip 192.168.2.141
    unicast_peer {
        192.168.2.142
    }

    authentication {
        auth_type PASS
        auth_pass <PASSWORD>
    }

    track_script {
        chk_haproxy
    }

    virtual_ipaddress {
        192.168.2.140/24 dev ens160 label ens160:1
    }
}
# For haproxy-lb2 VRRP Backup

vrrp_script chk_haproxy {
    script "pgrep haproxy"
    interval 2
    rise 3
    fall 2
}

vrrp_instance vrrp33 {
    interface ens160
    state BACKUP
    priority 100

    virtual_router_id 33
    unicast_src_ip 192.168.2.142
    unicast_peer {
        192.168.2.141
    }

    authentication {
        auth_type PASS
        auth_pass <PASSWORD>
    }

    track_script {
        chk_haproxy
    }

    virtual_ipaddress {
        192.168.2.140/24 dev ens160 label ens160:1
    }}

Very briefly, the vrrp_script chk_haproxy config block defines that Keepalived should first check and ensure that the haproxy process is running, before the load balancer node can be considered as a candidate to take up the virtual IP. There’s no point for a load balancer node to take up the Virtual IP, and not have a HAProxy operating to process connections. This check is also a fail-over criteria; if a load balancer node’s haproxy process fails, then it should give up the Virtual IP so that the backup load balancer can take over.

In the vrrp_instance vrrp33 block, we define the fail-over relationship between the two load balancer nodes, with haproxy-lb1 being the default active instance (with higher priority), and haproxy-lb2 taking over only if the first instance fails (lower priority). Note that the virtual IP is also defined here; This is the IP address identity that the active load balancer will assume to service incoming frontend connections.

Finally, restart the keepalived service on both nodes once the configs have been saved:

$ sudo systemctl restart keepalived

Peace of Mind

Well, that was somewhat involved, but we’re done. With this in place, barring a catastrophic outage, users using kubectl and k8s worker nodes configured to reach the control plane endpoint via FQDN / Virtual IP will not be affected by any single component failure at the Control Plane layer.

CLI Command Cheat-sheet for Aruba OS Wi-Fi

I recently put together a cheat-sheet for Aruba OS CLI commands which would be useful for a network team operating a new Aruba Wi-Fi network that I deployed, and thought to share this out.

Feel free to print out or PDF this post, it’s useful if you don’t have access to Internet and need a few quick reminders of what to type like I do. Yes, damn-what-is-that-command-itis is a thing.

CLI Tips and Tricks

<cmd> | include <specific string>
• Filter to display only lines that include a specific string
• Can use comma as an OR operator. Useful to include output headers, for example “show user-table | include IP,—,aa:bb:cc:11:22:33” will show column headers as well as the output line for the specific client.

<cmd> | exclude <specific string>
• Filter to display lines without the specific string

In AOS 8.x (Not in AOS 6.x), It is possible to chain include and exclude filters, for example:
<cmd> | include <specific string A> | exclude <specific string B>
<cmd> | include <specific string A> | include <specific string B>
<cmd> | exclude <specific string A> | exclude <specific string B>
The first displays results for (A AND NOT B), the second (A AND B), and the third (NOT A AND NOT B)

<cmd> | begin <specific string>
• Filter to display only lines from the first occurrence of a specific string

<cmd> [tab]
• Auto-completion, will complete a command if there is only one choice available

<cmd> ?
• Provide a list of commands which match the initial part of the <cmd> string
• Provide a list of parameters usable for the command

no paging
• Disable page breaks, useful for getting a huge amount of output for logging without requiring the administrator to hit [enter]. For example show run, show tech-support etc.
• Return to usual operation by typing “paging”

For commands which generate a lot of output, for example “show run” which will have page breaks, you can type “/” to search for a specific word, and “n” to search for the next occurrence. Similar to Linux “less” command.

Generally Useful Commands

show ap database / show ap database long
• shows details on all APs that the controller is aware of
• “long” includes AP Wired MAC and Serial Number

show ap active
• Shows APs which are currently Actively terminated on the controller, and summary of RF operating parameters

show switches (On Master Controller, if using Master-Local architecture)
• Shows if all configuration has been successfully pushed down to the controllers
• Shows OS versions of all of the controllers

show database synchronize (From Master Controller, if using Master-Local architecture)
• Validate that Master has successfully replicated configuration and DBs to the Backup Master

show master-redundancy (From Master Controller, if using Master-Local architecture)
• Show current state of master redundancy, i.e. who’s Master and who’s Backup.

apboot <various parameters, use tab to expand>
• Reboot specific APs or a set of APs.
• Useful if you don’t have access to PoE settings of the switchport
• Applicable only on the controller where AP is terminated

User Diagnostic – To be run on controller where users are present

show user-table (option to add “| include <client MAC>” to drill down)
• Shows general connectivity of the client, including IP address. If a client did not receive DHCP IP address, this entry will NOT exist. Hence…

show station-table mac <client MAC>
• Shows if the client (802.11 parlance calls this a Station or STA) is even associated to the network. If it is associated, but there is no entry on user-table, investigate role policies (Is DHCP blocked?) and DHCP server.

show user mac <client MAC>
• Shows VERBOSE details about a connected client. Use “| include” to narrow down for example:
o show user mac <client MAC> | include VLAN
o show user mac <client MAC> | include ACL
o show user mac <client MAC> | include SNR
o show user mac <client MAC> | include IP
o show user mac <client MAC> | include DHCP

(config) # logging level debugging user-debug aa:bb:cc:11:22:33
• Turns on logging for a specific client in the global configuration mode
• If not specified, and no other user-debugs exist, “show auth-tracebuf” will show for all user entries – Mind that the log buffer is not very long and you could miss what you’re looking for
• If not specified, and other user-debugs exist, will not show output for what is not explicitly specified.
• Remember to remove this (and any other debug commands) at the end of the debug session.

show auth-tracebuf (option to “ | include <client-mac>”)
• Show auth logs for the client (refer logging level debugging user-debug).
• Shows EAP transactions and interaction between client, controller and RADIUS.
• First thing to check if clients cannot connect – Look for Rejects!
• Follow up by checking for client auth failure reason at ClearPass Tracker

show ap remote debug mgmt-frames ap-name <ap-name> client-mac <client-mac>
• Shows the 802.11 management frame exchanges between the client and AP
• Useful to see association/authentication exchanges in the air and complements “show auth-tracebuf” for troubleshooting EAP exchange problems
• Also shows explicit deauthentication/disconnection exchanges

show ap arm history ap-name <AP Name>
• Shows AP ARM history – including channel and power changes over time

show ap arm client-match history client-mac <client MAC>
• Shows Client Match history for a specific client – Answers whether client were moved by ClientMatch (change AP, change radio band), and for what reason.

Data Path / Security Diagnostic

show rights
• Shows summarized list of all user roles in existence

show rights <role name>
• Shows policies, VLANs associated for a specific role

show datapath session table <client IP>
• Shows all concurrent connections and associated flags
• Each session creates two entries – Ingress and Egress entries, with “C” flag indicating the client initiating the connection
• Look out for zero bytes entries, missing return state entries, or “D” flag which could indicate firewall blocking the connections

Miscellaneous

show vrrp
• Shows VRRP information

show ip interface brief
• Shows IP interfaces

show controller-ip
• Shows which is the primary IP used by the controller, usually used by management (Master, AirWave, SNMP, RADIUS etc, unless explicitly specified otherwise.)