I had a bit of fun setting up an on-premise Kubernetes cluster some time back, and thought I’d share an interesting part of the implementation.
Briefly, today’s post describes how to set up network load balancing to provide resiliency for the Kubernetes control plane using HAProxy. To ensure that this does not create a single point of failure, we’ll deploy redundant instances of HAProxy with fail-over protection by Keepalived
Brief Overview – Wait, the what and the what, now?
A production Kubernetes cluster has three or more concurrently active control plane nodes for resiliency. However, k8s does not have a built-in means of abstracting control plane node failures, nor balancing API access. An external network load balancer layer is needed to redirect connections to the nodes intelligently during a service failure. At the same time, such a layer is also useful to distribute API requests from users or from worker nodes to prevent overloading a single control plane node.
The diagram below from the Kubernetes website shows exactly where the load balancer should fit in (emphasis in red is mine).

By the way, I definitely did not figure all this out on my own, but started by referencing the rather excellent guide at How To Set Up Highly Available HAProxy Servers with Keepalived and Floating IPs on Ubuntu 14.04, then adapting the instructions for load balancing k8s API servers on-premise instead.
Initial DNS and Endpoint Set Up
To make this work, you need a domain name and the ability to add DNS entries. It’s not expensive, a non-premium .org or .net domain costs about USD13 per year (less during promotions). It is useful to have a domain for general lab use, and for experiments like what we are doing here. Of course, if you’ve got an in-house DNS server with a locally-relevant domain, that’ll work as well.
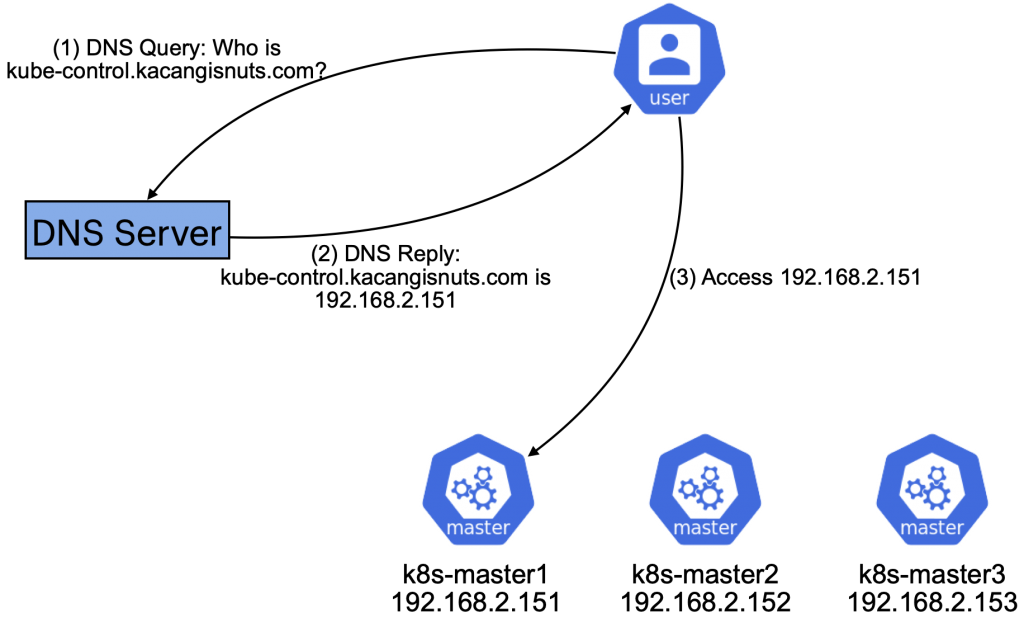
Whichever DNS service you go with, choose an fully-qualified domain name (FQDN) as a reference to your k8s control plane nodes. For example, I own the domain kacangisnuts.com, and would like my k8s control plane API endpoint to be reachable via the FQDN kube-control.kacangisnuts.com.
The steps to map the FQDN to an IP will differ by registrar. To start off, map the FQDN to the first k8s control plan node’s IP. We will update this later, but it is important to start with this to initialize the control plane. The mapping I use in my lab looks like the following:
- DNS Record Type: A
- DNS Name / Hostname: kube-control
- IP Address: 192.168.2.151
With this DNS entry in place, all connectivity to kube-control.kacangisnuts.com goes to the first control plane node.
At this point, set up the first and subsequent control plane nodes using the instructions at Creating Highly Available clusters with kubeadm. This post won’t go into the details of setting up the k8s cluster, as it’s all in the guide. A key point to note is that the FQDN to use as the k8s control plane endpoint must be explicitly specified during init. During my lab setup, that looks like:
kubeadm init --control-plane-endpoint=kube-control.kacangisnuts.com
Updating DNS and Configuring HAProxy Load Balancing
To get resiliency on the Control Plane, we will insert a pair of HAProxy load balancers to direct traffic across the control plane nodes. At the same time, we want to make use of health-checks to identify failed nodes, and avoid sending traffic to them.
Also, to avoid the load balancer layer itself becoming a single point of failure, we’ll implement load balancer redundancy by making use of Keepalived to failover from the Master HAProxy to the Backup HAProxy if a failure occurs.
At the end of the setup, we should have the following in place:

To start, first modify the DNS entry for kube-control.kacangisnuts.com to point at the Virtual IP that will be used by HAProxy pair.
- DNS Record Type: A
- DNS Name / Hostname: kube-control
- IP Address: 192.168.2.140
Set up two Linux instances to be redundant load balancers; I used Ubuntu 18.04 LTS, though any distro should work as long as you can install HAProxy and Keepalived. We’ll call these two haproxy-lb1 and haproxy-lb2, and install HAProxy and Keepalived on both like so:
sudo apt install haproxy keepalivedWithout changing the default configs, append the following frontend and backend config blocks into /etc/haproxy/haprox.cfg for both haproxy-lb1 and haproxy-lb2:
frontend k8s-managers.kacangisnuts.com
        bind *:6443
        default_backend k8s-managers

backend k8s-managers
        balance roundrobin
        mode tcp
        default-server check maxconn 20
        server k8s-master1 192.168.2.151:6443
        server k8s-master2 192.168.2.152:6443
        server k8s-master3 192.168.2.153:6443
This configuration load balances incoming TCP connections on port 6443 to the k8s control plane nodes in the backend, as long as they are operational. Don’t forget to restart the haproxy service on both load balancers to apply the config.
$ sudo systemctl restart haproxyConfiguring Keepalived for Load Balancer Resiliency
Keepalived will use the Virtual Router Redundancy Protocol (VRRP) to ensure that one of the HAProxy instances will respond to any requests made to the Virtual IP 192.168.2.140 (which, if you remember, we mapped kube-control.kacangisnuts.com to previously).
The following are configurations that need to be set at /etc/keepalived/keepalived.conf for the respective load balancer instances. There are slight differences between the configs of the nodes, so be sure to apply them to the correct nodes.
# For haproxy-lb1 VRRP Master

vrrp_script chk_haproxy {
    script "pgrep haproxy"
    interval 2
    rise 3
    fall 2
}

vrrp_instance vrrp33 {
    interface ens160
    state MASTER
    priority 120

    virtual_router_id 33
    unicast_src_ip 192.168.2.141
    unicast_peer {
        192.168.2.142
    }

    authentication {
        auth_type PASS
        auth_pass <PASSWORD>
    }

    track_script {
        chk_haproxy
    }

    virtual_ipaddress {
        192.168.2.140/24 dev ens160 label ens160:1
    }
}
# For haproxy-lb2 VRRP Backup
vrrp_script chk_haproxy {
script "pgrep haproxy"
interval 2
rise 3
fall 2
}
vrrp_instance vrrp33 {
interface ens160
state BACKUP
priority 100
virtual_router_id 33
unicast_src_ip 192.168.2.142
unicast_peer {
192.168.2.141
}
authentication {
auth_type PASS
auth_pass <PASSWORD>
}
track_script {
chk_haproxy
}
virtual_ipaddress {
192.168.2.140/24 dev ens160 label ens160:1
}}Very briefly, the vrrp_script chk_haproxy config block defines that Keepalived should first check and ensure that the haproxy process is running, before the load balancer node can be considered as a candidate to take up the virtual IP. There’s no point for a load balancer node to take up the Virtual IP, and not have a HAProxy operating to process connections. This check is also a fail-over criteria; if a load balancer node’s haproxy process fails, then it should give up the Virtual IP so that the backup load balancer can take over.
In the vrrp_instance vrrp33 block, we define the fail-over relationship between the two load balancer nodes, with haproxy-lb1 being the default active instance (with higher priority), and haproxy-lb2 taking over only if the first instance fails (lower priority). Note that the virtual IP is also defined here; This is the IP address identity that the active load balancer will assume to service incoming frontend connections.
Finally, restart the keepalived service on both nodes once the configs have been saved:
$ sudo systemctl restart keepalivedPeace of Mind
Well, that was somewhat involved, but we’re done. With this in place, barring a catastrophic outage, users using kubectl and k8s worker nodes configured to reach the control plane endpoint via FQDN / Virtual IP will not be affected by any single component failure at the Control Plane layer.